Another day of digging. I ended yesterday with my 1st bed finished and my 2nd half dug. I picked up the work today around 3pm and finished all 3 beds around 7:30pm. I decided to make the 3 beds with 3 different soil preparation methods:
The 1st bed was done with
single digging and the sod removed. It took about 3 hours. (right)
The 2nd bed done with
double digging, the sod (top layer) was buried underneath another layer of soil. This was the more laborious of all 3. It also took about 3 hours, but more heavy lifting was involved. (center)
The 3rd bed was done by just placing layers of newspaper on top of the sod and piling new soil in the frame. It took about 30 minutes, but I have my doubts about the effectiveness and benefits of this method. (left)
My feeling on all 3 is that the double digging is best when cultivating a bed for the first time. It was the hardest one to do, but well worth the work. There's always weeds, grass or something growing on the top of your soil that you want to take out before planting. Single digging just rotates the soil from one section to the next, what's on top of the soil still stays (relatively) on top. You have to manually pick out any weeds or plant matter that you don't want growing back. It's not so bad if you have a few plants here or there, but when there's a dense carpet of sod that's another story. You can't effectively till sod with just a single dig.
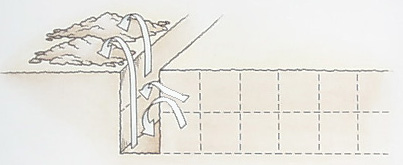
Double digging is hard for me to explain. It's basically like a single dig, but instead of rotating the soil from section to section you also rotate it from top to bottom. You start by removing 2 shovel's depth worth of soil and place it aside (each shovel's depth is a layer) Then you put the top layer of soil in the next section into the bottom layer of your first section. After that you cover that top layer with the bottom layer of that next section... Top layer becomes bottom layer, each section at a time. I was very confused by the instructions I read, even the illustration was no help, but once I got started digging it all made sense. I'll try to do a demo tomorrow. The plant matter in the top layer is buried so deep that it won't regrow. Not only is it covered with 12" of soil, but I'm putting on another 12" after the raised bed frame gets installed. No way is grass going to poke out of 24" worth of soil. Another benefit to this method is how fluffy it gets the soil! Because the soil takes up more volume I need to buy less soil to fill up the bed and I don't have to compost the sod, it gets composted in the ground. The only drawback is how laborious it is, but honestly it's not that bad.
*This is the method I'll use from now on when cultivating new beds.
The 3rd method I used was placing newspaper onto of the soil to act as a barrier and kill the sod under it. This is very simple, unless you're in a very wind situation. I don't know if I was doing it right, but I don't like this method. I'll illustrate below:

So I'll just call this the "Newspaper" method. It's as easy as it looks, lay down newspaper and pile soil onto of it. My issue with this is drainage. At my old home the previous owners had made a sidewalk garden using this method. I didn't know this at first, but noticed that when I was watering the water would run off fairly quickly and the soil also got dry quickly. It was mostly filled with drought tolerant plants like euphorbias, lavenders and sedums. I thought that I had let the soil dry out to much and it lost some of it's water retention qualities. After I started digging into the ground I found a layer of partially decomposed newspaper about 8" down. It was effective in blocking out plants/weed under it, but it also formed a barrier for water and accelerated topsoil evaporation. I noticed roots had a hard time penetrating the newspaper as well.

This is an image of all 3 beds in place. I don't know if I'm doing the "newspaper" method right, but if so it seems like a perfect waste of top soil buring it under newspaper, inaccessible to the plants above it. Then have to go buy a lot more soil to fill the bed. There's also the drainage and evaporation issue and I don't know what kind of chemicals are in the paper and ink. I wouldn't mind so much if I'm not eating the plants I grow. I guess you can do the same with a weed blocker fabric, but you lose soil depth. If I have a 12" raised bed and I dig another 12"-24" I'll have lots of room for roots to grow. I couldn't hurt to give those roots more space right?
Yes it's easy and quick, but it's no good, unless you're planting a parking strip and don't really care. You know one of the "set it and forget it" moments. I feel so strongly against this that I'm redoing this bed tomorrow with the double dig method. It'll add another day's work, but I'd rather do it now then regret it a month from now. At least it has no soil in it! So my conclusion is to double dig when cultivating new land. Heck I might go back and do it to the 1st bed too... maybe... I'll see how my aches are by then :P

Another photo of Guy being helpful. Notice how high the mound of soil it. This is from double digging, no soil has been added, it's just what was there fluffed up. Guy approves. :)
So tomorrow I redo my 3rd bed and fill the beds with soil. I'm hoping I'll be ready for planting on Wednesday or Thursday.




 Posts
Posts