Showing posts with label DIY. Show all posts

Tuesday, January 17, 2012

Paper Blossoms Tutorial for Chinese New Year

Paper Blossoms
I remember making paper blossoms for Lunar New Year decoration as a kid.  It's a symbol for Spring, luck and prosperity.  This is a fun and very simple project.  You can make your own just in time to celebrate the Lunar New Year on January 23rd!  Have fun!
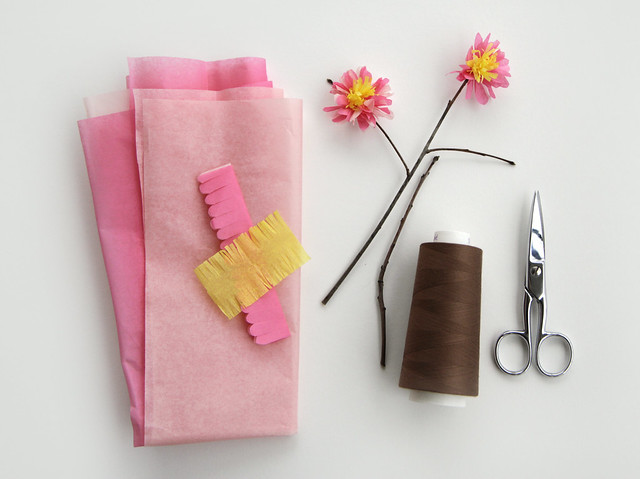
Paper Blossom Materials Needed
Materials:
Pink & yellow tissue paper (or whatever color you'd like to make)
Tree branches/twigs
Scissors
Ruler
Thread (I used brown to match that color of my branch)
Get the better quality tissue paper, usually they sell it by the sheet on racks.  This paper is stiffer, stronger and will hold it's shape better.  No worries if the only thing you can find is gift-wrap tissue.  This will work too, it's what I used for this tutorial.  One sheet is easily enough to make 40-50 flowers. 
Cuttings
Making The Petals
Step 1:
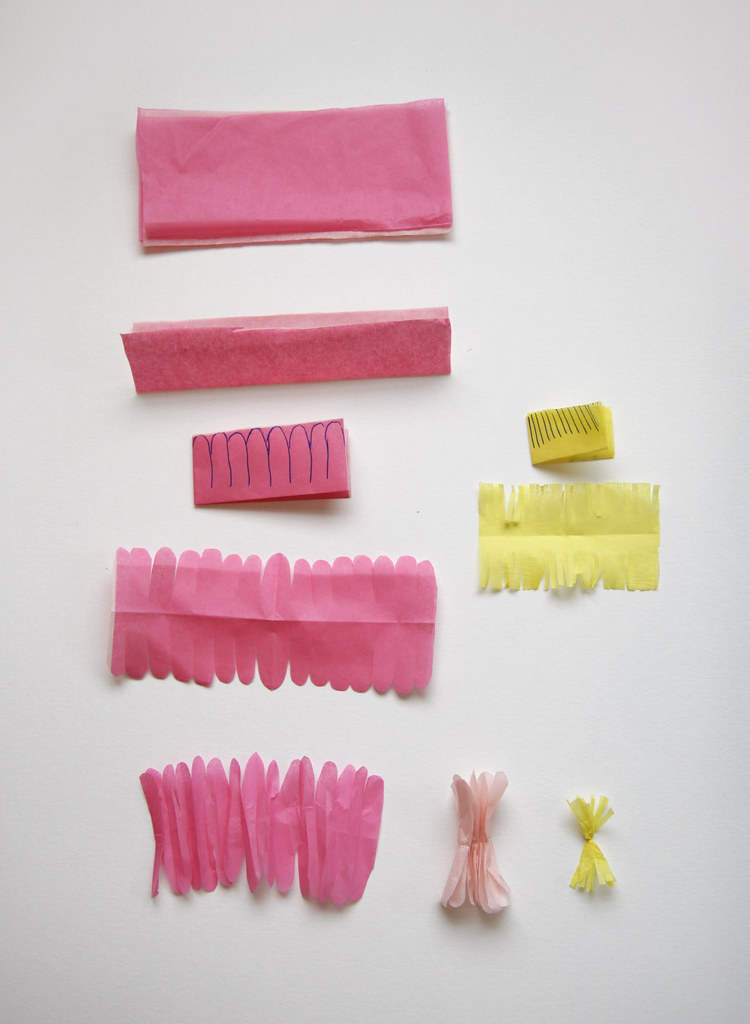
Cut pink tissue into 5" x 2" pieces.  They can be a little longer if you want a fuller flower with more petals.  I like to stack a few pieces together and cut them at the same time.  The tissue is so thin it's easier and faster to cut a small stack vs. one sheet.

Step 2:
Fold the tissue pieces into quarters... fold it in half length-wise and then fold in half width-wise.  Again I like to do this to 4 pieces at a time.

Step 3:
Cut deep lobed scallops along the open edge of the folded tissue.  So when you unfold the paper it will be scalloped on both edges.  Each scallop will become a petal when the flower is finished.

Step 4:
Gather the tissue by roughly pleating it.  It doesn't have to be neat, just keep the paper centered.  Pinch it in the center, don't twist.  I find it's easier to fan out the petals at the end when it's not twisted.
You've just made the petal portion of the flower!  

Making the Stamens:
The stamens are made the same way as the petals.  Use yellow tissue paper and cut it into 2" x 1.5" pieces.  Fold the tissue pieces in quarters and cut slits on the open edge creating a fringe on both sides when the paper is unfolded.  Because the sections are so small it might be easier to cut a long strip that is 1.5" wide, fringe it then cut it into 2" sections afterwards.
Repeat step 4 from making the petals and gather each sections, pinching it at the center.
1, 2, 3
Step 5:
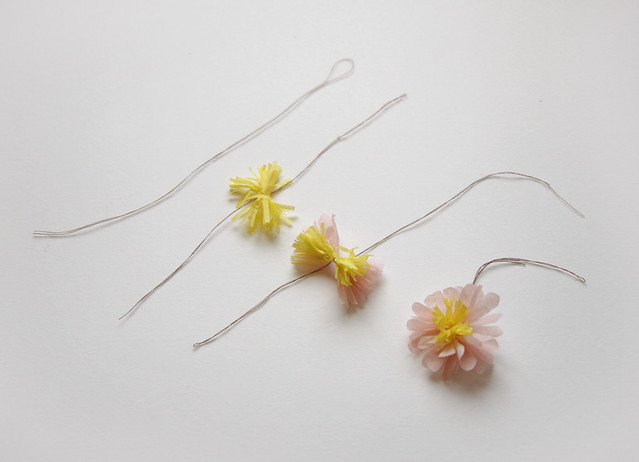
Now you have both the petals and stamens finished.  It's time to assemble the blossom.  Take a section of string and tie a double knot at the center of the stamen piece.  Then tie a double knot around the petal piece.  You'll get something that looks like a feathery bow.

Fluffing the Flower
Step 6.
Now your flower is assembled, you just need to fluff it out!  Take the stamens and pinch them up.  You can tug on them a bit, but don't pull too hard you might tear pieces out.  Then fan out the petals and fluff them up.  A better quality tissue will allow you to manipulate the flower more without tearing.

Paper Blossom Branches
Step 7.
Tie the flowers to your branch and trim off any excess string.  Use your aesthetic judgement on what looks best. ;)  You can make bigger branches for a center piece or just small bouquets.  If the flower flops around too much on the branch you can always add a dob of glue to hold it in place.  You can also make garlands by tying them to a ribbon.

Thank you for visiting the blog!  新年快樂!

Wednesday, July 14, 2010

Blueberry Cobbler of YUM!

YUM! It's what's for dinner.
Cobbler is one of my favorite desserts.  I've never made a cobbler, but I REALLY REALLY love eating them!  As luck would have it there was a sale on blueberries at the market and I decided to make one for dinner.  Not bad at all for my first cobber.  It's SO GOOD!  The only drawback is that I might eat the whole thing tonight... must... have... will power...

Here is the recipe:
I didn't have any fresh OJ, so I made some from concentrate (I know blasphemous) and I also added a tablespoon of lemon juice to balance out the sweet.  All in all I really liked it, next time I might make more topping or something a little crumblier.

Friday, June 25, 2010

The Yard: After

I'm so sorry this is a year late!  I started this huge "Raised Bed/Patio Yard of DOOM" project last year and totally neglected to post the finished result! So here it is a year and 2 months late:
Day 2
Progress shot Day 2 (Day 1 was just me ripping things out and digging out a stump)
This was taken April '09.  Before I started this project the yard was a gloomy overgrown mess, constantly damp and shady.  I wanted to have a vegetable garden and an area that I would enjoy spending time in. The paved section, with lumber sitting on it, was previously a pit of gravel.  It was too unstable to set chairs on and wasn't very inviting.  The pavers were about $200 and it took me 2 days to do it.  Luckily the ground was level and fairly compacted, if not it would have been an extra days worth of work.  I really LOVE the stone path that the previous owners put in.  They made some good choices, but it just wasn't optimized.

Our little yard
After the paving was done I started building the raised beds.  This corner of the yard was the sunniest.  I had to remove a mound of dirt and the stump from a sizable prunus tree.  It was a biatch, someone had planted it with a wire cage around the root-ball?!  Thank you who ever it was... thank you very much.
After I leveled the dirt I marked where the beds would sit.  I decided to make 2 beds for that corner.

Day 3
Progress shot Day 3
There are many ways to build a raised bed.  I used this raised bed tutorial from Popular Mechanics and changed the design a bit.  Since it's such a small area I didn't need the drip system.  The basic idea is to build a 4 sided box without a bottom.  The lumber cost was about $120 and I had another $40-$50 worth of misc. supplies like screws, weed blocker, PVC tubing and brackets for the trellis/tent system.  I had most of the tools required so I didn't have to buy anything but the materials.  There's also the cost of dirt...
If you're not the handyman type or don't have a chop saw etc... there are kits you can buy.  They're usually pricier and do not include lumber.  Here are some that I like:
Natural Yard Kit The cool thing with this one is that you can take it apart and you can put it together with just a hammer.
http://www.composters.com/raised-garden-beds.php
http://www.cleanairgardening.com/staking-kit-bed.html

Garden in June
This is the yard finished.  This picture was taken 2 months after I started the project.  It took me 4-5 days over the period of 2 weeks to finish.  It's become a much needed space for me.  I love poking around in the dirt even when I'm crazy busy with work.  Being in it is very peaceful and I can just let my mind go blank for awhile.

Wednesday, March 10, 2010

From Sketch To Prototype

At the drawing table
A little peek behind the curtains at the making of a plush doll.  I will be sending few dolls to Gallery Hanahou in May.  It's for their Lost At Sea show, curated by Kirsten Rask of Schmancy.

The creation process usually starts with design sketches or doodles.  From there I make a full-sized drawing to get a sense of the proportions. I found the easiest way to make my pattern is to cut directly from the full-sized drawing, adding a 1/4" to 1/2" seam allowance. This is where I make most of my adjustments and corrections, trimming and redrafting each piece/panel to achieve the desired form. The shaping and fitting phase is probably the most frustrating part, I had to walk away and eat a cup of pudding a few times...

Take 2
This is one of the mock-ups along side the original sketch.  This mock-up is made from the 5th or 6th head shape and 2nd body shape I've tried.  I use muslin or thrift store bed sheets as the base fabric for the mock-ups, no sense in wasting good/expensive yardage. 
**however different fabrics behave differently.  Sometimes adjustments in the pattern is needed to accommodate for the final fabric.

Full sized sketch
Full-sized drawing on tissue, I also like using drafting velum for this purpose.

Doll and pattern
The finalized pattern and prototype. There are minor adjustments I'll make from here, but all-in-all the dolls will look like this when I'm done.

Version 3.0
Testing how photogenic she is... as well as playability. :)
I think we'll call her Wabi-chan.  Since she's a prototype, she's quite imperfect... I thought Wabi (Wabi-Sabi) would be fitting.

Monday, June 8, 2009

Miniature Tree Tutorial

I needed some miniature trees for an art project earlier in the year and found some on Ebay for making model landscapes and train set scenery.  They would have worked well but I really wanted specific tree forms so I decided to make my own. Here's my tutorial, it's such a simple and quick project.

Materials for Mini Trees
Materials:
2 pairs of needle nose pliers with wire cutting feature
Copper or steel wire, 26 gauge is preferred
Ruler for measuring wire for cutting
Beads, bases or other embellishments (optional)
5 minute or quick dry Epoxy for securing tree to base
Safety glasses (& rubber gloves if you have a hard time holding the wires)
*I've used brass wire, but it's much too stiff to bend easily and silver wire tends to be too soft and breaks too easily.
*You can use a lower gauge. thicker wire, but it'll be harder to work with. But it's helpful if you want to make bigger trees.

1
Step 1:
Cut five lengths of wire about 7"-8" long. As a rule of thumb the wire should be three to four times the height of your tree. I'm making a 2" tree so these wires are 7"-8"long. It also depends on the shape of your tree... an upright will need less wire length... a weeping will need more. You'll get the hang of it once you make a few.

2
Step 2:
Loosely bend wires in half and make sure not to crimp the wire (like in the upper right).  You want a U shape and not a V shape.  Gather all the wires together and match up the cut ends.
If you want a beaded tree then insert 3-5 beads per wire (lower right). Basically each bead equals to the number of branching you get.

How to use pliers
Step 3:
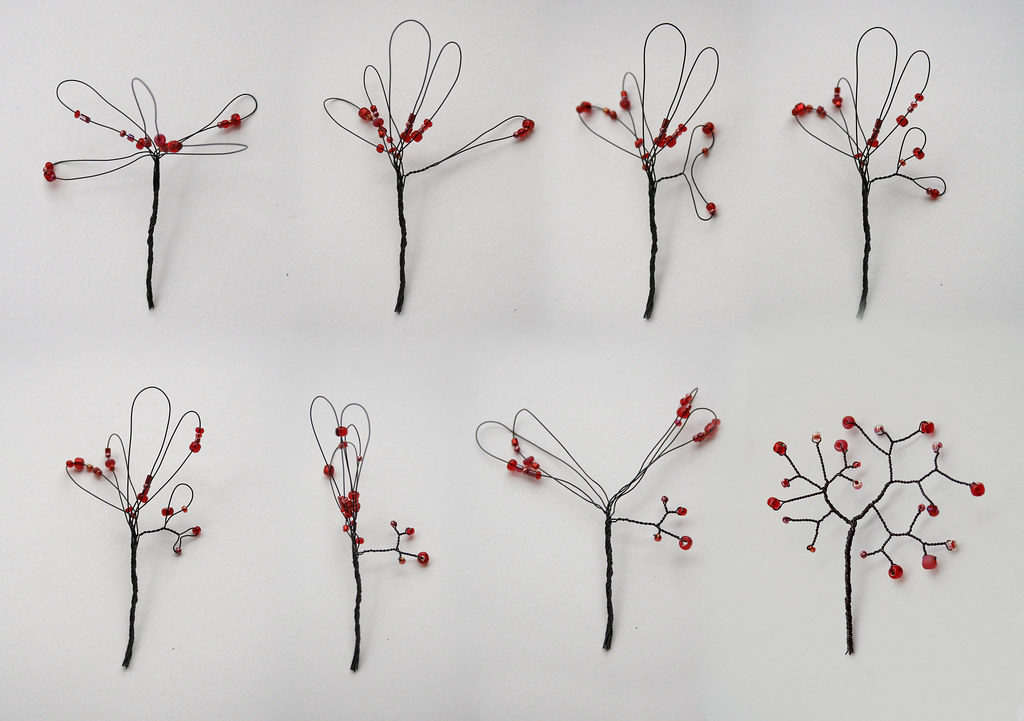
Starting from the cut ends and twist all the wires together.  It may be easier to start the first few twists with your fingers then use the pliers to tighten the turns.  It takes a few tries to get the twists tight and even, but be careful not to over twist or you'll break the wires.  Keep twisting until you get your desired trunk length.  This is a judgment call, I usually go half way up like this:
3

4
Step 4:
Once you’ve finished the trunk fan out the looped ends and start branching.  Divide and twist… divide and twist. Work each branch to completion then move on to the next one. There’s no wrong way to do this, just use your judgment. You’ll get better at making more realistic trees after you make a few. Just be sure to not over twist or the wire will break.
If you’re working with beading make sure to divide the beads evenly when you branch. Each bead will sit at the tip of each branching.
(*Tip: More branches you give you shorter trees/branches. Fewer branchees will give you longer limbs or taller trees. Longer branches will be better for a windswept or weeping tree.)

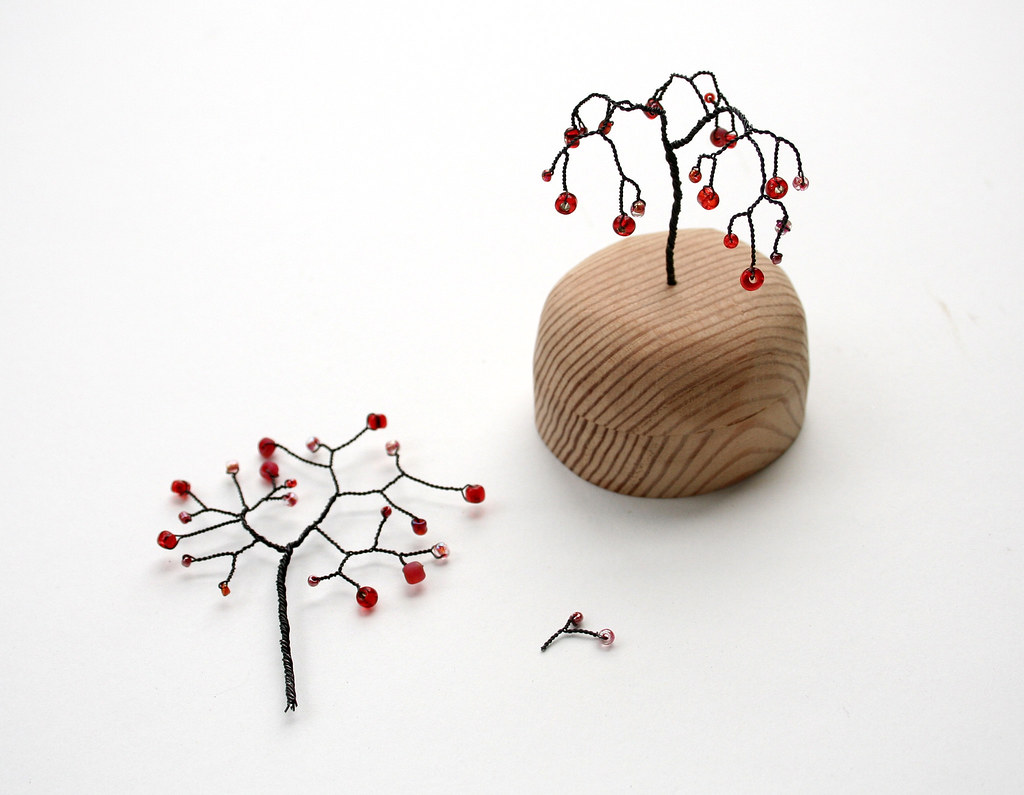
Have some fun... don't worry too much about how it'll turn out until you've got the process down. The fastest way I learn is by making mistakes :)  This is what finished branching looks like:
Finished Branch

Finale!
Finishing/ Step 5:
Now that you have your finished branch you can shape it to become your tree! This is where a little creativity and play comes in. The wires are very malleable so feel free to bend away... try different forms. If you're unfamiliar with tree shapes I recommend looking at Bonsai books for inspiration. For a good base drill a small hole in any suitable object. Apply some epoxy to base of tree to secure your planting :)

Have fun folks!
Here's more of my DIY's

Tuesday, April 21, 2009

Urban Gardening Part 1

Earthbox the real thing
I bought this "Earthbox" when we lived in our tiny apartment. I was dying to grow something, ANYTHING! It's a self watering container... basically a 2 compartment planter, you put the soil in the top compartment and there's a water reservoir below. I've had this box for over 8 years and it's held up GREAT! It's a very efficient way to plant, wasting almost no water. I've planted veggies as well as flowers and vines. The only downside is the price tag, at about $50 a pop. If you can afford it I would recommend getting one, but if you can't here's a great tutorial on how to make your own self watering container!


Home-made Earthbox
Here's mine, with few little amendments. The tutorial calls for buying 2 plastic containers and I thought that was a bit wasteful... I only used one. I cut the lid to form the divider between the soil and water. I cut a few plastic supplement jars to serve as a platform for the divider. **I made these 2 years ago and they've held up well, but the lid divider is a bit flimsy**


Homemade Earthbox continued
Assembled and planted... the first year I did peas and zucchinis. The peas did well and the zucchinis got attacked by mold :( The second year I did tomatoes and peas... we had about 20 pounds of tomatoes from that one box. My balcony is East facing and is in the shade for much of the day, so I would say that these are VERY EFFECTIVE!

It's finally getting sunny in Seattle, this is a fun and CHEAP weekend project you can do. Cost was about $14-16 per box, that's including soil.
Plastic bin $5
Soil $7
PVC pipe $3
I had a lot of the misc stuff like wire already... I also reused a lot of stuff that was destined for the recycle bin. HAVE FUN!

Thursday, March 26, 2009

Chè đậu trắng


Chè đậu trắng (White Bean Dessert)
One of my favorite desserts... well actually ALL desserts are my favorite desserts! This is a very simple dish that can be made in a single pot. I'm kind of lazy at writing down recipes and I'm horrible at following them as well. I tend to "eye" things and use finger measurements. I think it's my mom's doing. I remember when she taught me how to cook rice she said "put rice in the pot til it reaches your first knuckle and pour water in until it reaches your second." I recently lost the plastic cup that goes with my rice cooker and I've been following my mom's instructions... seems to be working fine.


There are different preferences to this dessert... wet or dry. It should be the consistency of a porridge or stiff oatmeal. I like it stiff so if you like it runny add more water to my recipe. The ONLY ingredients are: sticky (sweet) rice, black-eyed peas, sugar and coconut milk (thick white kind).

Che Dau Trang
1/2 cup of Black eyed peas (soak overnight)
1 cup of Sticky (Sweet) rice
1 can of Coconut milk
1/2 cup of sugar
4 cups of water (feel free to add more)


Wash rice, mix beans, rice, sugar and water together and cook on stovetop. Bring to boil then turn down to medium heat. Just watch the pot and make sure it doesn't burn, add water if necessary. It's done when it's consistency of porridge or oatmeal... you can also take a nibble to see if the rice and beans are soft. You can also add sugar if it's not sweet enough or add water if it's too stiff.

Serve warm or chilled in a bowl, topped with coconut milk. Nom Nom!

Sunday, February 8, 2009

Homesick Comfort Food

Homesick Comfort Food!

I felt a bit homesick yesterday and made some Gon Lou noodles... it's what grandma or mom used to make for me. Gon Lou is Cantonese or "dry mixing" or "dry stirring" a very popular way of preparing noodles. It's similar to ramen or Pho but with egg noodles and without the broth. A simple dish to prepare and easy to eat, you won't burn your mouth on the soup. Hence it's a dish served to a lot of children. :)

This is about a 5min meal.
Boil water, toss in noodles, let boil for 2-3 mins (I like them slightly Al-Dente)
While noodle is still boiling, toss veggies for about 1 min. I like to flash cook the veggies so they won't overcook. This way they retain their color, crunch and nutrients. My faves to use are Gai-Lan, Bak Choy, Napa Cabbage or Broccoli.
Drain noodles and veggies, toss in sesame oil and Hoisin sauce (or soy sauce)... shred in some chicken or tofu and eat! I always have boiled chicken in the fridge for a quick meal.

I imagine this as the Chinese pizza... you can't go wrong. Put in your favorite veggie and meat or non-meat product. The noodle is like the pizza dough and the ingredients are like the toppings! ^_^

More info on Lo Mein (mixed noodles)