Showing posts with label Urban Gardening. Show all posts

Thursday, April 21, 2011

Day 4 & 5 Finished!

Day 5 Finished!
Day 5 and I'm finished!

I spent 3 hours yesterday (Day 4) redoing the newspaper bed.  I removed the frame, took out all of the newspaper I had laid down and double dug the bed.  Then I reinstalled the frame.  I was tired by the end of that 3 hours and called it a day.

Today (Day 5) I filled all of the beds with soil.  I'm surprised it took almost 5 hours to do!  I also cleaned up the work site a bit.  I found that it was faster to mix the soil directly in the beds.  I started by mixing in the wheelbarrow and that wasn't very efficient.  I'm planning to make a summery post so that all of the important information is in one place. 

All-in-all this project took 5 days (about 22 hours not including travel time to the many stores).  I was able to do most of this myself, but you definitely need a second person to lift the raised bed frames and set them in place.  The cost was about $250 with soil. 

And so we start.
And so we start!  We went to a few nurseries and bought some starter plants.  I was surprised to really like the plant selection (and price) at Fred Meyer.  I went to the one in the Ballard/Fremont area.  Their plants were healthy and well watered with the exception of a few cucumber flats. 

I'm also starting a few things from seed like spinach, lettuce, radishes and peas.  I've found with plants like tomatoes and peppers I get better results from buying gallon pots.  It'll be my first time growing broccoli and cabbages.  I never had enough space before, they're such HUGE plants.  Fingers crossed!

Phase II
As I was finishing off with the beds I looked over to the gate and began to wonder what I can do there... maybe a row of raspberries or asparagus?  This will be the never ending project. 

Tuesday, April 19, 2011

Raised Bed Day 3

My day's work
Another day of digging.  I ended yesterday with my 1st bed finished and my 2nd half dug.  I picked up the work today around 3pm and finished all 3 beds around 7:30pm.  I decided to make the 3 beds with 3 different soil preparation methods:

The 1st bed was done with single digging and the sod removed.  It took about 3 hours. (right)

The 2nd bed done with double digging, the sod (top layer) was buried underneath another layer of soil. This was the more laborious of all 3.  It also took about 3 hours, but more heavy lifting was involved. (center)

The 3rd bed was done by just placing layers of newspaper on top of the sod and piling new soil in the frame.  It took about 30 minutes, but I have my doubts about the effectiveness and benefits of this method. (left)

My feeling on all 3 is that the double digging is best when cultivating a bed for the first time.  It was the hardest one to do, but well worth the work.  There's always weeds, grass or something growing on the top of your soil that you want to take out before planting.  Single digging just rotates the soil from one section to the next, what's on top of the soil still stays (relatively) on top.  You have to manually pick out any weeds or plant matter that you don't want growing back.  It's not so bad if you have a few plants here or there, but when there's a dense carpet of sod that's another story.  You can't effectively till sod with just a single dig.

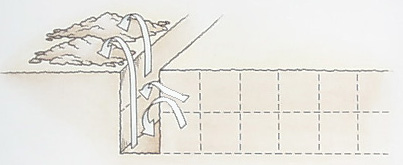
Double digging is hard for me to explain.  It's basically like a single dig, but instead of rotating the soil from section to section you also rotate it from top to bottom.  You start by removing 2 shovel's depth worth of soil and place it aside (each shovel's depth is a layer)  Then you put the top layer of soil in the next section into the bottom layer of your first section.  After that you cover that top layer with the bottom layer of that next section... Top layer becomes bottom layer, each section at a time.  I was very confused by the instructions I read, even the illustration was no help, but once I got started digging it all made sense.  I'll try to do a demo tomorrow.  The plant matter in the top layer is buried so deep that it won't regrow.  Not only is it covered with 12" of soil, but I'm putting on another 12" after the raised bed frame gets installed.  No way is grass going to poke out of 24" worth of soil.  Another benefit to this method is how fluffy it gets the soil!  Because the soil takes up more volume I need to buy less soil to fill up the bed and I don't have to compost the sod, it gets composted in the ground.  The only drawback is how laborious it is, but honestly it's not that bad.
*This is the method I'll use from now on when cultivating new beds.

The 3rd method I used was placing newspaper onto of the soil to act as a barrier and kill the sod under it.  This is very simple, unless you're in a very wind situation.  I don't know if I was doing it right, but I don't like this method.  I'll illustrate below:
Newspaper down
So I'll just call this the "Newspaper" method.  It's as easy as it looks, lay down newspaper and pile soil onto of it.  My issue with this is drainage.  At my old home the previous owners had made a sidewalk garden using this method.  I didn't know this at first, but noticed that when I was watering the water would run off fairly quickly and the soil also got dry quickly.  It was mostly filled with drought tolerant plants like euphorbias, lavenders and sedums.  I thought that I had let the soil dry out to much and it lost some of it's water retention qualities.  After I started digging into the ground I found a layer of partially decomposed newspaper about 8" down.  It was effective in blocking out plants/weed under it, but it also formed a barrier for water and accelerated topsoil evaporation.  I noticed roots had a hard time penetrating the newspaper as well. 

Frame on
This is an image of all 3 beds in place.  I don't know if I'm doing the "newspaper" method right, but if so it seems like a perfect waste of top soil buring it under newspaper, inaccessible to the plants above it.  Then have to go buy a lot more soil to fill the bed.  There's also the drainage and evaporation issue and I don't know what kind of chemicals are in the paper and ink.  I wouldn't mind so much if I'm not eating the plants I grow.  I guess you can do the same with a weed blocker fabric, but you lose soil depth.  If I have a 12" raised bed and I dig another 12"-24" I'll have lots of room for roots to grow.  I couldn't hurt to give those roots more space right?

Yes it's easy and quick, but it's no good, unless you're planting a parking strip and don't really care.  You know one of the "set it and forget it" moments.  I feel so strongly against this that I'm redoing this bed tomorrow with the double dig method.  It'll add another day's work, but I'd rather do it now then regret it a month from now.  At least it has no soil in it!  So my conclusion is to double dig when cultivating new land.  Heck I might go back and do it to the 1st bed too... maybe... I'll see how my aches are by then :P

Helper
Another photo of Guy being helpful.  Notice how high the mound of soil it.  This is from double digging, no soil has been added, it's just what was there fluffed up.  Guy approves. :)

So tomorrow I redo my 3rd bed and fill the beds with soil.  I'm hoping I'll be ready for planting on Wednesday or Thursday.

Monday, April 18, 2011

Raised Bed Day 2

What a broken back looks like
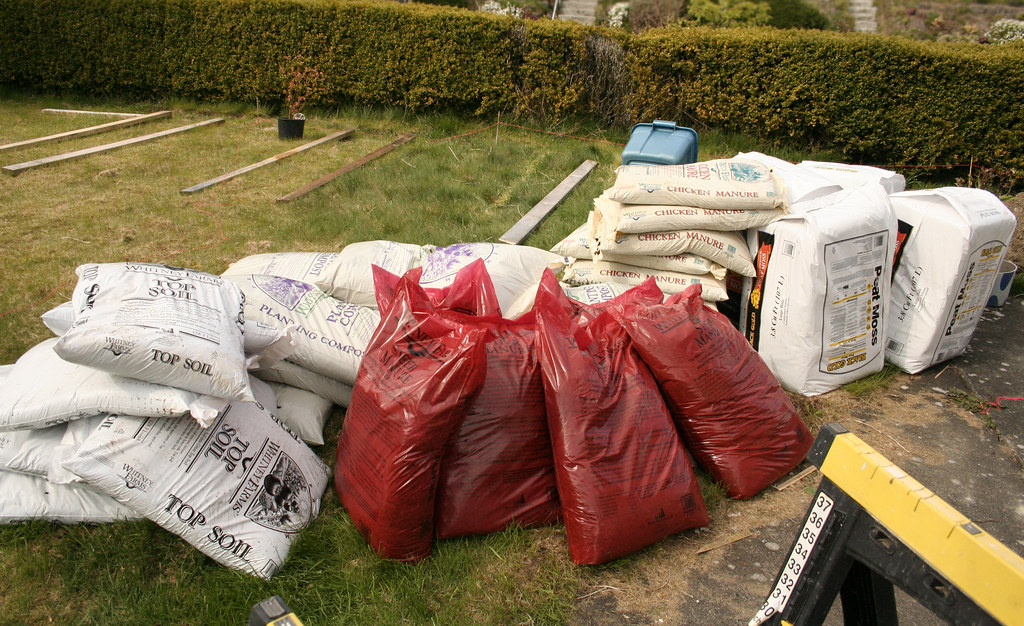
This is what a broken back looks like!  We hauled about 70 cubic feet worth of compost, manure, peat moss and top soil up 10 steps and into our back yard.  I'm so thankful the old owner left his wheelbarrow behind.  It saved the day!  This is about $200 worth of soil and 3 trips in the Prius.

You can calculate how much soil you need by multiplying your bed's height, width and length.  Mine is 4x8x1= 32 cubic feet of soil is needed per bed (times 3 beds is 96 cubic feet).  I'm going to mix in some fill dirt that was left by the south side of our house.  The fill is clean and mostly sand. 

Cutting into the land
Today was the ground breaking and back breaking day.  This is the no-fun part and I would totally recommend renting a rototiller.  I started by marking out where the beds will go and used a shovel to cut a perimeter.  This gives me a nice clean edge.  I've dug 2"-3" wider than the bed's dimensoins to make sure I clear all of the grass around it. 

Second tilling
The next step is to till it.  This is just plain ol' elbow grease.  Nothing makes it easier...  I used a Japanese garden hoe similar to this one from JapanWoodworker, but with a longer handle.  I found that angle and ergonomics was good for me.

This is where I stopped today, we started at about 11am with buying and hauling soil and I stopped working at about 7pm.  We took 2 hours off to each lunch and wander through the Ballard Farmer's Market.  So for about 6 hours of work I got 1.5 beds tilled and all of my soil brought on site.  My husband and I did the hauling together, but I worked on the tilling by myself.  So you can gage the amount of work it takes to prepare for a raised bed.

There are lots of different methods used on how to build a raised bed (and how to prepare the soil).  You just have to pick the one that you have the energy and resources for.  I'm going to experiment with a few methods in each box.

Dug and ready
This is my first bed.  I've removed the sod and tilled it.  I started with the 2 steps above (cut the perimeter and a rough till).  After breaking the sod into big chunks I shook out soil and tossed the sod aside.  In most of the forums I've read removing the sod is unnecessary.  I just did it for the hell of it.  At this point it's ready for the raised bed frame.  Tilling and preparing this patch took about 2 hours and 30 minutes.
*To get the dirt out from the sod I beat clumps of it against a 2x4.  Lots of dirt went flying everywhere, my hair, my eyes, my mouth... not fun.  Not the best way to do this.

I won't be removing the sod in the other 2 bed.  I will double dig my 2nd bed (started and half-way done) and I'll just lay newspaper over the sod on the 3rd bed.  These are both methods that others have used and said works.  I'd like to see which 3 method is best at promoting plant growth and inhibiting weed/grass growth in the beds.  I'd like to see what the easiest & most efficient way is.  I'll have more info on the other 2 beds tomorrow (weather permitting) and I'll keep you guys posted throughout the season.

One down, 2 to go
This is the first bed with frame installed.  After tilling we lowered the frame into place, filling in any low points and making sure it was level.  We lifted the frame up again to dig a small trench where the frame was.  You'll see an indentation/footprint in the soil, just dig an inch or 2 slightly larger than that footprint.  Fill it with gravel for drainage.  I forgot to buy gravel this morning, but I had a bucket of small rocks laying around.  I packed the rest with the sandy fill dirt I had (not as good as gravel for drainage).  This drainage trench will help keep your wood dryer.  It'll still rot eventually, but this gives you some extra time.

Lower the frame onto your gravel once again and pack the outer perimeter with soil.  I just shoveled some fill dirt all the way around the walked on it.  You're pretty much just setting it into place.
*Where I live I'm not so concerned with digging critters so I didn't install chicken wire under the frame.  If you're concerned with moles or rats, rabbits etc. you should do so. This bed is ready for soil.  I'm waiting to fill all 3 at the same time.

Staking
I don't know if this is necessary either, but I staked all 4 corners of the frame into the ground.  This keeps it from moving around, but I assume once it's been loaded with soil it's not going anywhere.

A Little Too Wide
Today I realize that 4' across is pretty wide, especially given the extra lumber widths making it a total of 51" wide.  I'm on the shorter side and I can tell reaching the middle is going to be a hassle.  If you're shorter or have back issues I'd go with 3' or 3.5' wide beds.

My Little Helper
Just in case you guys are wondering.  This is Guy, my supervisor.

Sunday, April 17, 2011

Raised Bed Gardening 2.0

Cut and Ready!
Today I started on the new raised beds.  This is the 2nd time I've built these and I've made a few changes to the first version.  Building a raised bed is very easy with a few good tools.  If you're interested in starting your own garden check out this wonderful article by Kate Gardner from PlanetNatural. So here are the details:

3 Beds total (for now... I'm probably going to build 2 or 3 more)
I really want a winter garden and a few beds to grow onions and garlic in, not to mention potatoes/yams.  All of these crops require a dedicated space for almost the entire growing season (in Seattle).  Unlike beans, peas, leafy greens, radishes and chard etc. where I was able to do 2 or 3 rounds in the same space.  With a yard that's about 2000sf I want to challenge myself to grow for year round eating!  I'm not much of a lawn person anyways :P

Beds are 4' x 8'
It just makes sense with lumber being 8' long.  It also fits nicely in the Prius.  Yes we hauled all of the lumber you see in that pic in our 2005 Prius!  It's like live action tetris.


Beds are 12" high
My first version was 18" high (or three levels of 2"X6") and it needed A LOT of soil to fill!  This time I'm only going with a 12" high bed (or two levels of 2"x6").  I searched around for more info on bed height and found this great video from GrowingYourGreens.

Cedar and Hemlock Fir
I originally planned on making all of my beds from cedar, but 2"x6"x8' cedar lumber was about $14.00 each and I needed 6 per bed.  Each bed would be about $90 with corner posts... that's a little more than I want to spend.  Lowes also had the same in Hemlock Fir for about $4 (or about $30 per bed with corner posts).  I debated for awhile at the cost vs. longevity of the wood and for the sake of experimentation I decided to go with both.  We made 2 Fir and 1 Cedar bed.  I'll keep you guys posted on how these compare to each other.

Costs
6 Cedar 2"x6"x8' = $84.00
12 Hemlock Fir 2"x6"x8' = $48.00
2 Hemlock Fir 4"x4"x8' = $16.00
Total for 3 beds: $148.00 (not including soil or misc things like screws and nails)

The Tools
Tools for the job:
circular saw, pencil, level, tape measure and drill.  You'll also need nails or screws and a level area to put it all together on.  It really helps to have a concrete pad or patio.  Measure and cut the wood.  Each bed has four 8' sections and four 4' sections and four corner posts that are 12"high.  Well the posts are really 11" since 2x6 lumber is really 1.5"x5.5".  

I Cheated
After you cut all of your pieces lay them out on a flat surface and begin to assemble.  In the past I used clamps to hold the wood together then pre-drilled and screwed them together... or you can have a helper hold the wood together, but it always slips or moves.  I cheated this time and used a nail gun!  It was soooo much faster!  I still pre-drilled and used screws, I just don't trust brad nails to withstand years of abuse.  I tend to overdo it.  This was the original tutorial I used from Popular Mechanics.


3 Down
My husband helped me with these and we managed to put all 3 together in about 2 hours.  I also added some braces in the middle of the 8' sections, my old beds were a bit wobbly in the middle. Tomorrow we'll deal with the soil and "install" our beds.

Friday, October 15, 2010

Last Harvest of 2010

My Last Harvest
My last harvest this year.  Our nights are getting chillier and days getting shorter.  So long summertime, I'll see you again next year.  With a heavy heart I pulled up all of my tomato, zucchini and cucumber plants.  It was hard picking the tomatoes before they have a chance to ripen, but I wanted to experiment with a winter crop this year.  Most of my plants were getting moldy as well, it's just time for a clean up.  Now I just have to figure out what to do with all this tomato!  I pickled some of the green ones and gave some away.  I still have 2 full bags in the fridge.
The summer has been wonderful, besides for a few supplemental veggies we haven't had to buy produce since late June.  We're not huge salad eater mind you, we still have to buy fruit.  I wish I had enough land for an orchard (and some llamas, goats & chickens)!  LOL

All Done! Garden in Oct
I cleared the beds, tilled the soil and added some some bone meal and fertilizer to the mix.  Not too much just enough to replenish the soil after a summer's worth of growth.  I've never overwintered plants before and I'm not sure if I'm starting too late in the year.  We still have a few warm days left, I hope this is enough to germinate the seeds I've planted.  I'll need to make some kind of frost protection, maybe plastic sheets over the hoops?

Sad Chard and OnionI spaced out my chard and onion in the small bed, they were being crowded by my tomatoes during the summer. Hopefully they'll survive the transplant and last me a few more months.  I've heard that chard is a hardy plant and do well in cool/cold weather.

One More Round
All of the local nurseries and garden centers have cleared out their stock of edibles.  Besides for herbs like rosemary and sage I couldn't find much so I had to resort to seeds.  I think next year I'll start some seedlings in September for my winter crop.  I chose broccoli and cabbage, they're hardy plants. 

Something to look forward to.
While I was at it I bought some tulip and allium bulbs too.  They give me something to look forward to come springtime.

Saturday, October 2, 2010

September Garden Update -belated

The Yard Oct 1st 2010
The garden is winding down and fall is approaching.  It's been a lack-luster year due to our cooler than average spring.  Our mild winter has also produced an abundance of pests like slugs, snails and aphids... Literally every broad leafed plant I have is holey, it's been frustrating to say the least.
*The "W" was a little experiment I did for Wrigley's gum... the project fell through but I have another idea hatching!  It's made with gum.

The Garden Oct 1st
My biggest success was the zucchini and cucumber plants!  I've been getting 2-3 large zuchs and cukes a week.  I planted 3 zucchini plants and 4 cucumber plants.  The cucumber surprised me the most and I've been enjoying Greek salads for 2 months now.  I'm not remotely sick of eating cucumbers yet and will miss them come winter.  The Burpee's Supreme is definitely welcome in the garden next year.

What you see in the picture above is my 2nd round of planting for the year.  I started with spinach, lettuce, peas, radishes, peppers (BIG FAIL), chard & tomatoes (which is just ripening).  The 2nd round consisted of zucchini, cucumber, onion more chard and long beans... also various herbs in gallon containers.  I'm toying around with a 3rd round of planting for winter harvest?  Maybe garlic, cabbage, kale and more chard???  It's supposed to be a very severe winter and I've never overwinter crop plants before.  If I am to do it I'd need to start now and pull out the plants that are slowing production.  I still have to wait for the tomatoes to ripen... but the zucchinis are starting to mildew and they've stopped producing...  So many decisions and so much to experiment with.  I'm learning as I go!

Some of the Last
My latest haul... I'm getting less cucumbers and zucchinis but more tomatoes.  There's also a handful of basil, Vietnamese cilantro (rau răm) and shiso (thanks to Vic ^_^).  This is a weekly harvest with tomatoes coming in between.

Tomatoes Rippening
The Tomato Jungle:
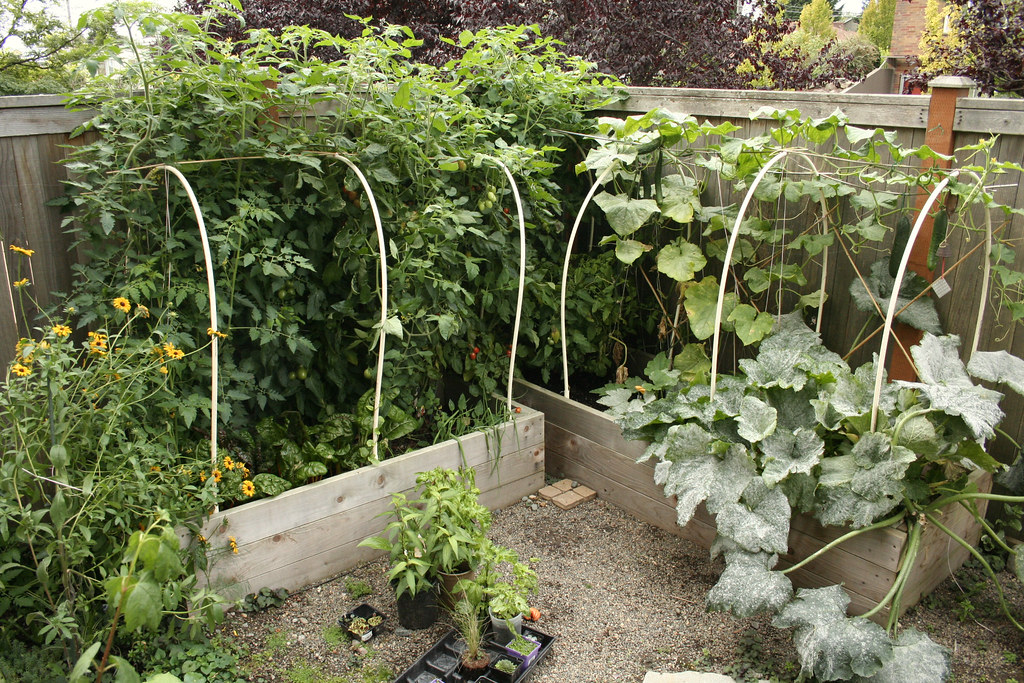
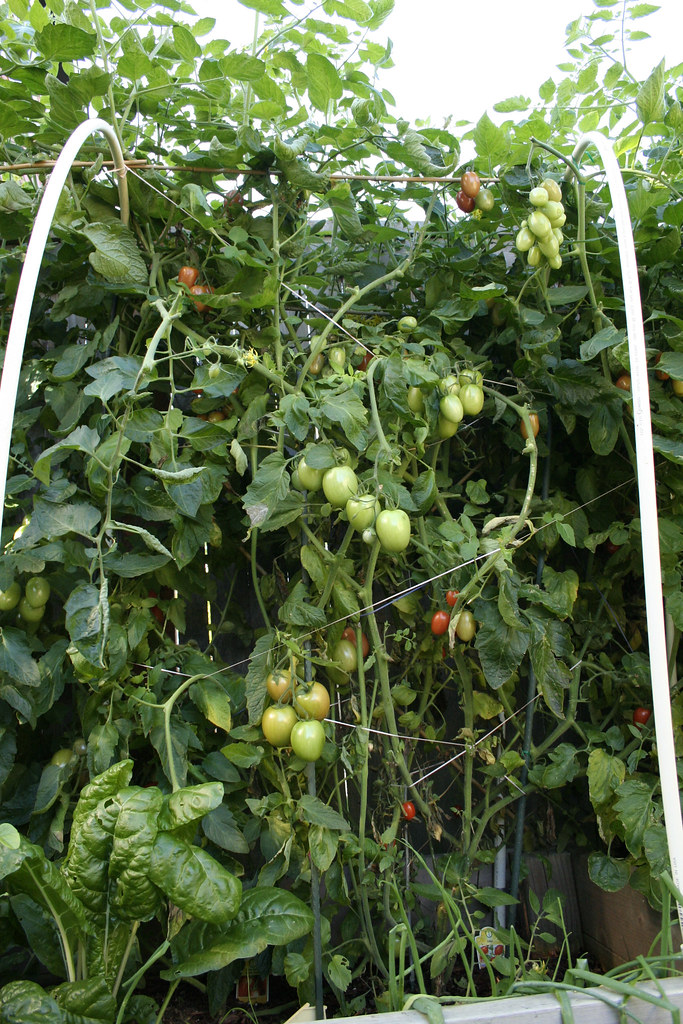
My tomatoes are finally ripening.  I pruned away the lower leaves so I can actually see where the tomatoes are.  Seeing this makes me happy!


Shiso from Vic!
Shiso
A good friend of mine gave me a few shiso plants this year.  It was my first time planting and eating it.  It has a very distinct spicy/pungent flavor.  It's hard to describe, but GREAT grilled with meats.  I pickled these leaves and ate them wrapped around rice (much like how you would use grape leaves).  I've had the Vietnamese variety before, which is purplish and much spicier.  My parents used to make Nem Nướng, only they would wrap these leaves around the meat before grilling.  The result is a nice infused flavor.
*Thank you Food for For for the amazing recipe!  A bit THANKS to Vic for the plants and pickling spices.

Vietnamese Cilantro Rau Ram
Rau Răm is another one of my favorite herbs.  We used to eat these with baby duck eggs (Hột vịt lộn - Warning the link is pretty graphic!)  You eat the eggs with a handful of these leaves and salt & peper for flavoring.  I've always been squeamish about eating a little duck fetuses... so I would just have it with a hard boiled egg instead.  It was a wonderful peppery taste and provides a nice kick.  I would recommend eating it raw.  The effects aren't there when cooked.

It's not all fun and games.  Here are a few FAILS from the garden:
Onion FAIL
Green onion FAIL!
The tomatoes overshadowed these poor guys and I have a pile of limp greens.  But the good news is the slugs and snails left them alone! :P

Malabar Spinach FAIL
Malabar Spinach FAIL!
I started these from seed late in the season and they never took off... they were also heavily targeted by the slugs.  I was supposed to have a vast jungle of them by now, being that they are vigorous growers.  But alas this tender trailing vine is the only thing I have.  Maybe I can bring this one indoors over the winter and have a head start next year.
For those unfamiliar with Malabar Spinach it's like eating okra, very slimy with an abundance of mucus.

I think he's dying...
Maple Tree FAIL!
I think I killed him by digging around and disturbing his roots.  I had to clear off some bamboo runners and I transplanted another tree next to him.  I'll do a severe pruning and hope he comes back next year.

Tuesday, August 10, 2010

Summer Distractions

Swiss Chard
I think chard is one of the most under-appreciated leafy greens out there.  I would grow it just for the visual impact alone!

This Morning's pick
The garden is in full swing and vines are bursting with fruit.  It's such a precious time I find it hard to work.  My old college prof. (Steven Vroom) said to me once, "A garden is dangerous to artists."  I didn't believe him, but it is...

The Enemy Was Here!
The enemy was here!  At night I like to hunt for slugs and snails... the crazy lady out in her yard with a flashlight.  It's the only way to be sure, search and destroy! :P

Thursday, July 29, 2010

Gardening Update

2 weeks
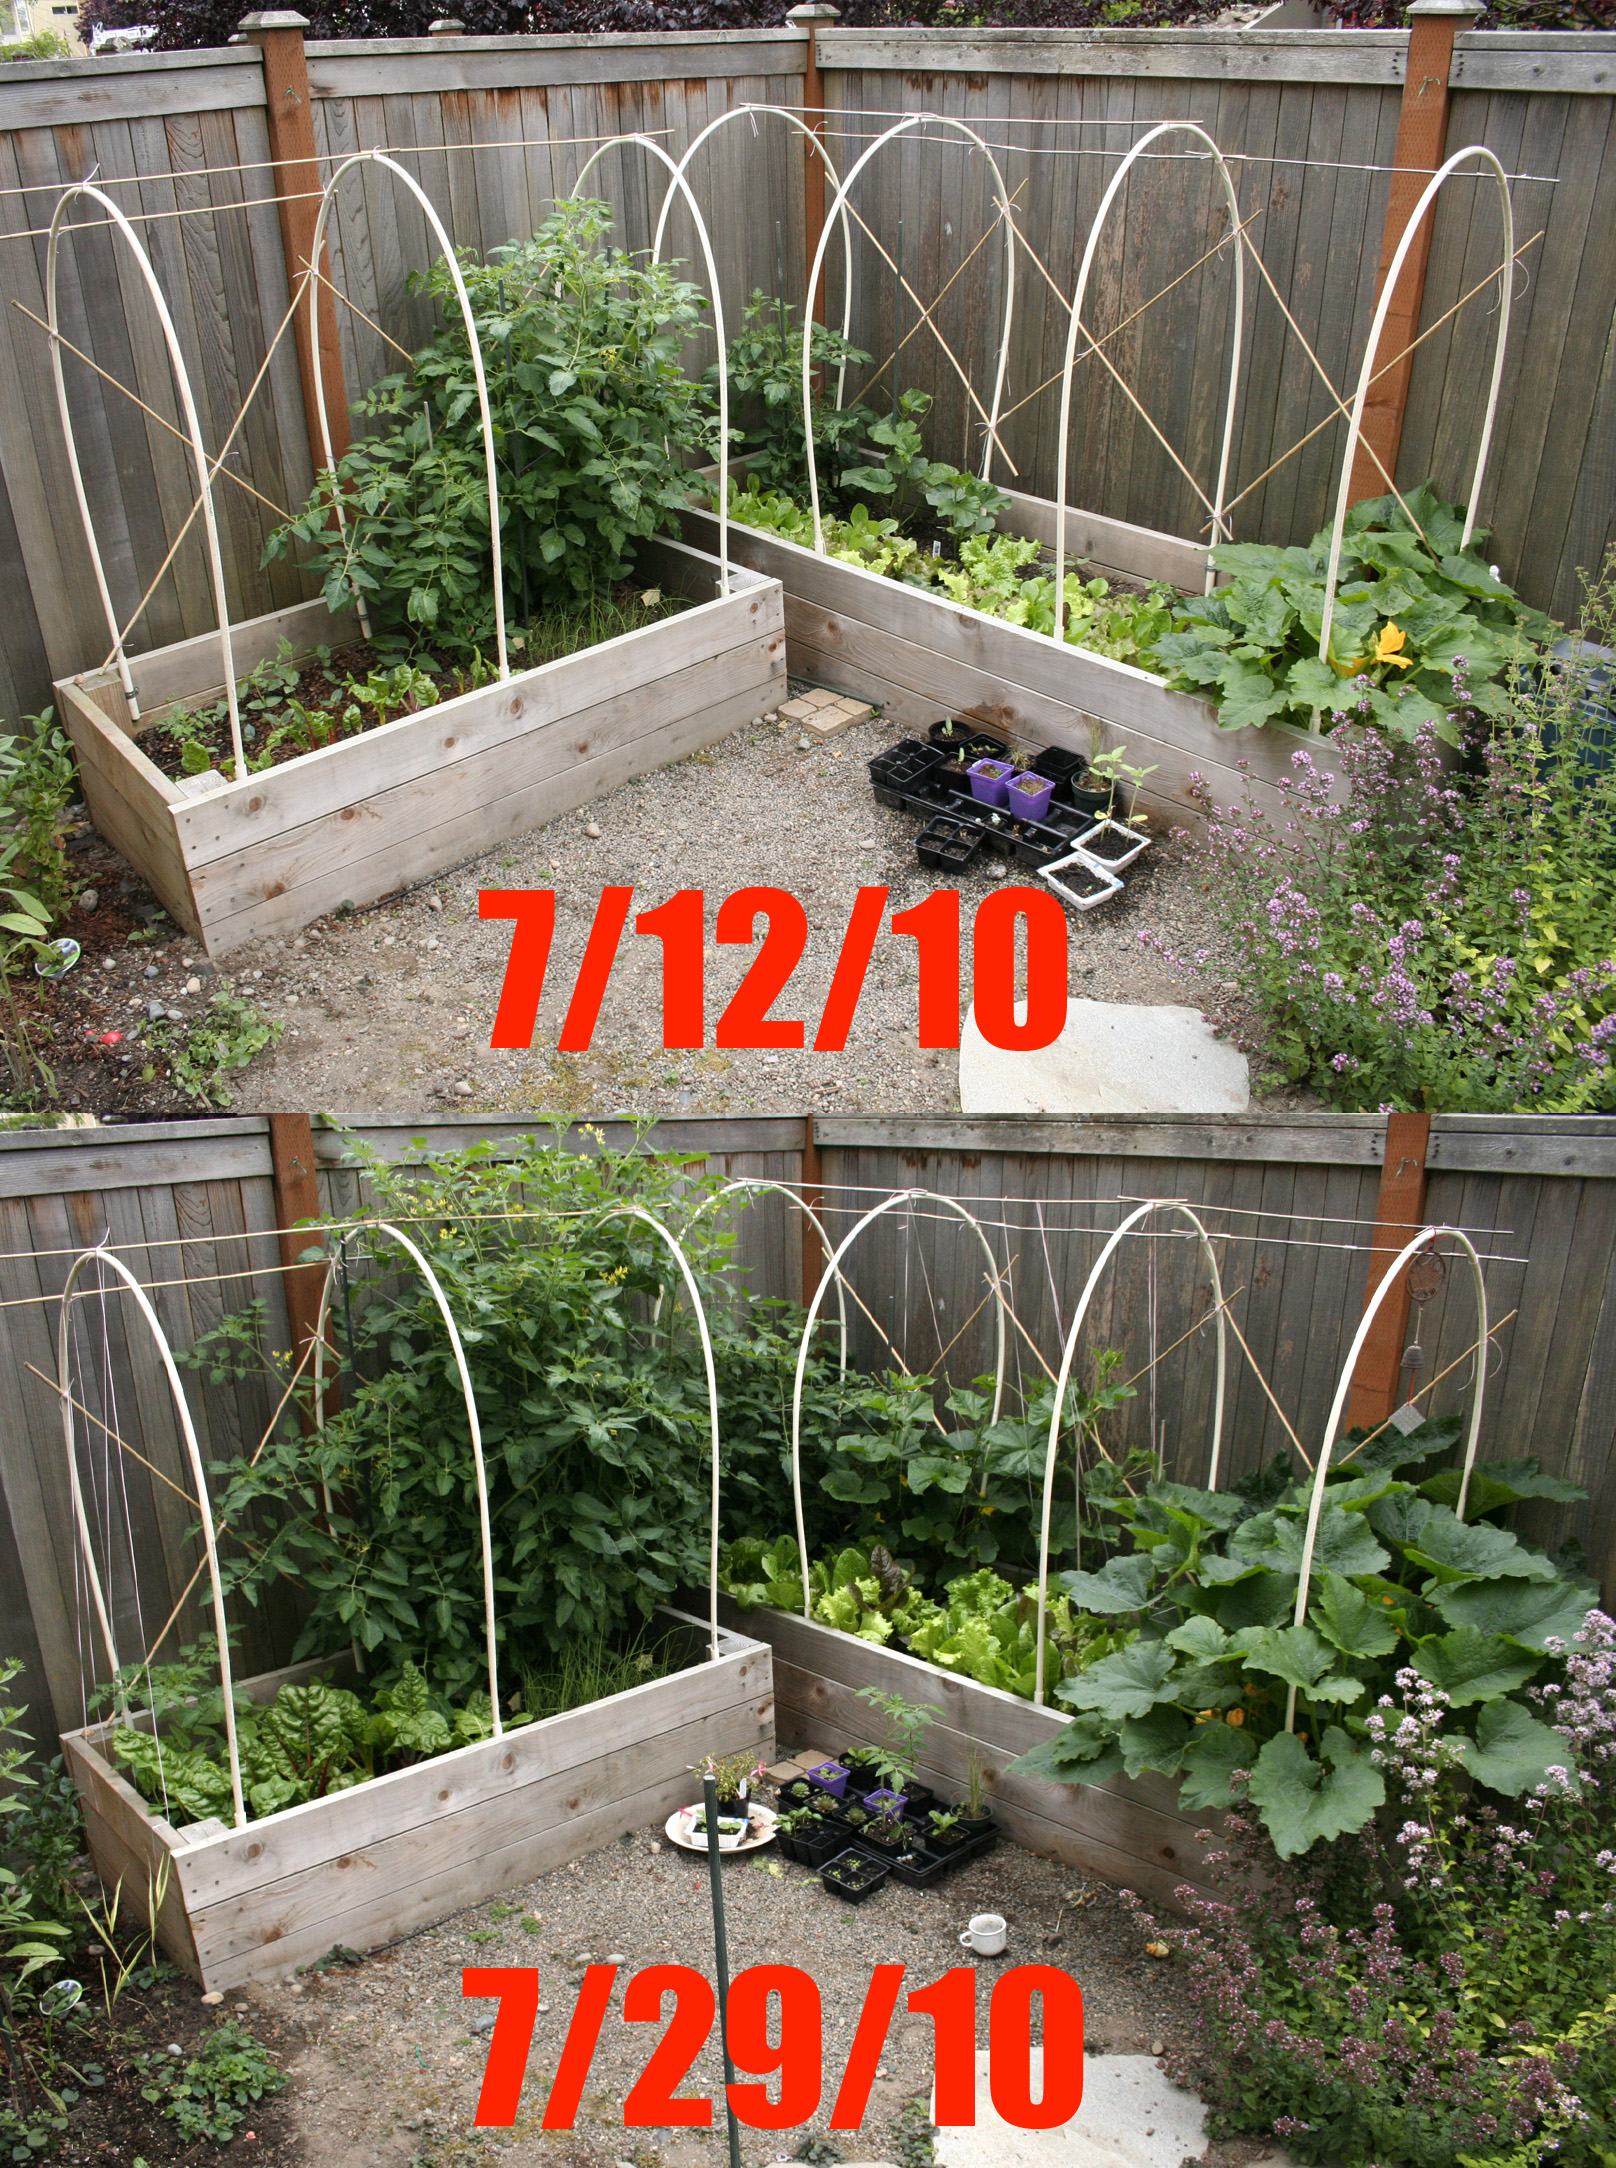
Summer has finally hit in Seattle and I'm so happy!  Yes gardening is a big distraction to art making, but hey how many days of sun do we get in Seattle?!  This is about 2 1/2 weeks of growth in the raised beds.  It's amazing what sun and heat can do for plants.

Future Zucchinis!
Zucchini blossoms:
I had really bad luck with my zucchinis last year.  The leaves kept getting mildewy and the baby zuchs just shriveled up and dropped off.  I found out that mildew is a huge problem, especially if you plant where the air is stagnant.  I had planted them in a back corner of the raised bed last year.  This year I decided to give them the primo-front and center location.  There's a nice draft, a lot more sun and enough room for them to grow.  I also read that spraying milk on your plants will help keep mildew at bay.  I haven't tried it yet.

Zuch Blossom
As an added benefit the zucchinis also live next to a huge clump of oregano, which attract a lot of pollinators.  It turns out my baby zuchs were dropping last year because they weren't fertilized.  It's called "fruit abortion"... brings about all sorts of horrible visuals.  But when the seeds aren't fertilized the plant decides it doesn't need to bring the fruit to full maturity.  Why waste the energy right?  The bees are definitely doing their job this year!


The Harvest
This was my first zucchini harvest this year!  I got 5 this week from 2 plants.

Monday, July 19, 2010

Edible Weed ~ Hydrocotyle bonariensis

_MG_8222
This is Hydrocotyle bonariensis.  Although it's considered a weed in many southern states, it's actually  native to that area!  I found some in my uncle's garden in Texas and thought it was Rau Ma (Centella asiatica or Gotu Kola).  Long story short I dug up a few rhizomes and planted it in my garden in Seattle.  I used to drink Rau Ma juice as a kid and have seen the juice offered in a few Vietnamese deli's and restaurants here.  But I really wanted to grow my own.

_MG_8228
Although this isn't Rau Ma, it smells exactly like it when crushed.  Hence my miss identification.  I've actually only seen the plant once, when I was 5 or 6...  The scent never left my memory.  It's much like smelling freshly crushed Pandan leaves (Pandanus amaryllifolius), you never forget such a sweet and unique scent.   

_MG_8229
The rhizome cutting I took from Texas grew very quickly and I was able to harvest some leaves today for juicing.  I had my doubts that this was the "right" plant but I juiced/ate it anyways... stupidly of me!  DO NOT EAT ANYTHING UNLESS YOU'RE 100% SURE IT'S EDIBLE!  Luckily for me this was...

The leaves I juiced was very close to what I remember, only it had a slightly bitter aftertaste which is not inherent in the Centella asiatica leaves.  Also the fragrance from fresh Rau Ma juice would enveloping your nostrils, but this juice only had a hint of that intensity.  From those two facts I knew I had the wrong plant... of course by now I had already drank 1/4 cup worth (about 6 crushed leaves) and had forced my husband to drink as much... Oops!  No... no tingly feeling yet... no nausea, headaches or impulses to vomit... my throat is not itching.  "Goooooooood!" I thought.  Hubby had the poison control number handy. 

I sat down and did a hardy search to I.D. the plant.  It wasn't hard, I found it within a few minutes.  I also have some plant classification experience.  I should have done this BEFORE ingesting the plant!  Instead of being Centella asiatica it is Hydrocotyle bonariensis and it's also edible.  From doing the search I found an interesting article about edible weeds:
Weeds as a future source of human consumption. 

_MG_8237
Hydrocotyle bonariensis pureed and strained.
Both Centella asiatica and Hydrocotyle bonariensis have beneficial medicinal purposes.  But as a medicinal herb it has many different properties, some of which may adversely effect your particular condition... please read up on any supplements before you take it.

_MG_8240
Sure it looks pretty now... Hydrocotyle bonariensis juice.  Strained Pureed leaves mixed with water and a spoonful of sugar for taste.  I wouldn't recommend it... slightly bitter and it might kill you if you I.D. the wrong plant! (LOL I laugh because I'm not dead)  But now I am on a search for the real Centella asiatica plant.  Saw some seeds on Ebay... I think this post needs a Part Deux!

I just wanted to make a quick note about collecting plants from the wild... unless you're qualified AND permitted to do so please don't do it.  Also please take special care if you're foraging for edibles, be sure you know what you're eating and what's on your food.  Many plants in urban settings are contaminated, especially aquatic plants like water-cress (and the one I've harvested).  These aquatic plants are like sponges that soak up any chemicals, poisons and parasites around it.  Not to mention plants that live below the waist might have been urinated on.  I collected my sample from my uncle's garden, to be more precise his vegetable patch.  I also took the sample home and grew a new batch of foliage from it... I didn't eat the sample directly.  I made a huge mistake in ingesting the plant before I was 100% sure of what it was!  That was really stupid, please don't do what I did!  Here's a great Universal Edibility Test for those of you who are interested.

Saturday, June 26, 2010

Raised Bed Gardening First Year

This is a little catch-up from last year's gardening adventures...  I'm getting better about posting more often.
The beds in July
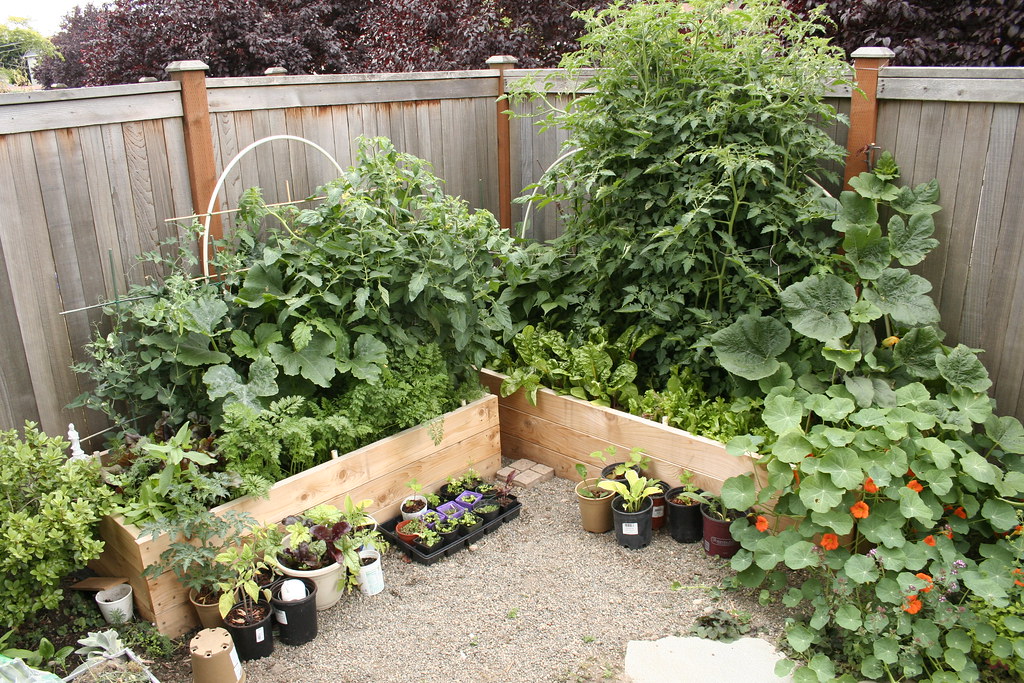
This was my raised bed garden in July 2009.   I built the beds in April, this was only 3 months of amazing growth!   Looking back there were a few factors that lead to this lush sight.   It was virgin soil with plenty of nutrients and I added bone meal and veggie fertilizer in the mix.  It was also a really hot and sunny summer. We hit 3-digit days in Seattle, that's unheard of!!!

I was a total NOOB to growing vegetables.  My strategy was to cram plants in where ever there was space, resulting in some plants crowding and overshadowing others.  I planted zucchinis in the middle of one bed and it pretty much took over the whole space.  I learned my lesson this year and planted it in an outer corner.  When it grows it can spill out of the box leaving plenty of room for other plants.  I'm also growing more leafy greens instead of root veggies.  I eat a lot more greens and they don't take as long to mature.  My carrots and beets didn't do too well.  Maybe I need more sun?

A few shots of what I pulled from the garden last year.
I haz harvest!

Latest Harvest

Guy Approves

Romas

Japanese Eggplants

What came from the garden

Tonight's dinner
It was also really nice getting to sit in the garden and eat.