Monday, April 18, 2011

Raised Bed Day 2

What a broken back looks like
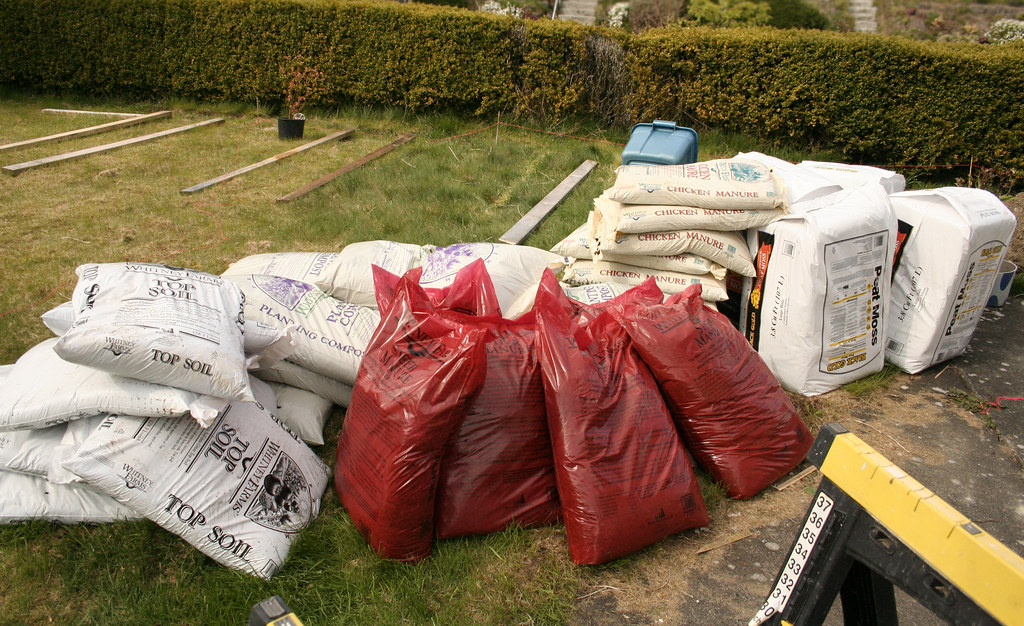
This is what a broken back looks like!  We hauled about 70 cubic feet worth of compost, manure, peat moss and top soil up 10 steps and into our back yard.  I'm so thankful the old owner left his wheelbarrow behind.  It saved the day!  This is about $200 worth of soil and 3 trips in the Prius.

You can calculate how much soil you need by multiplying your bed's height, width and length.  Mine is 4x8x1= 32 cubic feet of soil is needed per bed (times 3 beds is 96 cubic feet).  I'm going to mix in some fill dirt that was left by the south side of our house.  The fill is clean and mostly sand. 

Cutting into the land
Today was the ground breaking and back breaking day.  This is the no-fun part and I would totally recommend renting a rototiller.  I started by marking out where the beds will go and used a shovel to cut a perimeter.  This gives me a nice clean edge.  I've dug 2"-3" wider than the bed's dimensoins to make sure I clear all of the grass around it. 

Second tilling
The next step is to till it.  This is just plain ol' elbow grease.  Nothing makes it easier...  I used a Japanese garden hoe similar to this one from JapanWoodworker, but with a longer handle.  I found that angle and ergonomics was good for me.

This is where I stopped today, we started at about 11am with buying and hauling soil and I stopped working at about 7pm.  We took 2 hours off to each lunch and wander through the Ballard Farmer's Market.  So for about 6 hours of work I got 1.5 beds tilled and all of my soil brought on site.  My husband and I did the hauling together, but I worked on the tilling by myself.  So you can gage the amount of work it takes to prepare for a raised bed.

There are lots of different methods used on how to build a raised bed (and how to prepare the soil).  You just have to pick the one that you have the energy and resources for.  I'm going to experiment with a few methods in each box.

Dug and ready
This is my first bed.  I've removed the sod and tilled it.  I started with the 2 steps above (cut the perimeter and a rough till).  After breaking the sod into big chunks I shook out soil and tossed the sod aside.  In most of the forums I've read removing the sod is unnecessary.  I just did it for the hell of it.  At this point it's ready for the raised bed frame.  Tilling and preparing this patch took about 2 hours and 30 minutes.
*To get the dirt out from the sod I beat clumps of it against a 2x4.  Lots of dirt went flying everywhere, my hair, my eyes, my mouth... not fun.  Not the best way to do this.

I won't be removing the sod in the other 2 bed.  I will double dig my 2nd bed (started and half-way done) and I'll just lay newspaper over the sod on the 3rd bed.  These are both methods that others have used and said works.  I'd like to see which 3 method is best at promoting plant growth and inhibiting weed/grass growth in the beds.  I'd like to see what the easiest & most efficient way is.  I'll have more info on the other 2 beds tomorrow (weather permitting) and I'll keep you guys posted throughout the season.

One down, 2 to go
This is the first bed with frame installed.  After tilling we lowered the frame into place, filling in any low points and making sure it was level.  We lifted the frame up again to dig a small trench where the frame was.  You'll see an indentation/footprint in the soil, just dig an inch or 2 slightly larger than that footprint.  Fill it with gravel for drainage.  I forgot to buy gravel this morning, but I had a bucket of small rocks laying around.  I packed the rest with the sandy fill dirt I had (not as good as gravel for drainage).  This drainage trench will help keep your wood dryer.  It'll still rot eventually, but this gives you some extra time.

Lower the frame onto your gravel once again and pack the outer perimeter with soil.  I just shoveled some fill dirt all the way around the walked on it.  You're pretty much just setting it into place.
*Where I live I'm not so concerned with digging critters so I didn't install chicken wire under the frame.  If you're concerned with moles or rats, rabbits etc. you should do so. This bed is ready for soil.  I'm waiting to fill all 3 at the same time.

Staking
I don't know if this is necessary either, but I staked all 4 corners of the frame into the ground.  This keeps it from moving around, but I assume once it's been loaded with soil it's not going anywhere.

A Little Too Wide
Today I realize that 4' across is pretty wide, especially given the extra lumber widths making it a total of 51" wide.  I'm on the shorter side and I can tell reaching the middle is going to be a hassle.  If you're shorter or have back issues I'd go with 3' or 3.5' wide beds.

My Little Helper
Just in case you guys are wondering.  This is Guy, my supervisor.

Sunday, April 17, 2011

Raised Bed Gardening 2.0

Cut and Ready!
Today I started on the new raised beds.  This is the 2nd time I've built these and I've made a few changes to the first version.  Building a raised bed is very easy with a few good tools.  If you're interested in starting your own garden check out this wonderful article by Kate Gardner from PlanetNatural. So here are the details:

3 Beds total (for now... I'm probably going to build 2 or 3 more)
I really want a winter garden and a few beds to grow onions and garlic in, not to mention potatoes/yams.  All of these crops require a dedicated space for almost the entire growing season (in Seattle).  Unlike beans, peas, leafy greens, radishes and chard etc. where I was able to do 2 or 3 rounds in the same space.  With a yard that's about 2000sf I want to challenge myself to grow for year round eating!  I'm not much of a lawn person anyways :P

Beds are 4' x 8'
It just makes sense with lumber being 8' long.  It also fits nicely in the Prius.  Yes we hauled all of the lumber you see in that pic in our 2005 Prius!  It's like live action tetris.


Beds are 12" high
My first version was 18" high (or three levels of 2"X6") and it needed A LOT of soil to fill!  This time I'm only going with a 12" high bed (or two levels of 2"x6").  I searched around for more info on bed height and found this great video from GrowingYourGreens.

Cedar and Hemlock Fir
I originally planned on making all of my beds from cedar, but 2"x6"x8' cedar lumber was about $14.00 each and I needed 6 per bed.  Each bed would be about $90 with corner posts... that's a little more than I want to spend.  Lowes also had the same in Hemlock Fir for about $4 (or about $30 per bed with corner posts).  I debated for awhile at the cost vs. longevity of the wood and for the sake of experimentation I decided to go with both.  We made 2 Fir and 1 Cedar bed.  I'll keep you guys posted on how these compare to each other.

Costs
6 Cedar 2"x6"x8' = $84.00
12 Hemlock Fir 2"x6"x8' = $48.00
2 Hemlock Fir 4"x4"x8' = $16.00
Total for 3 beds: $148.00 (not including soil or misc things like screws and nails)

The Tools
Tools for the job:
circular saw, pencil, level, tape measure and drill.  You'll also need nails or screws and a level area to put it all together on.  It really helps to have a concrete pad or patio.  Measure and cut the wood.  Each bed has four 8' sections and four 4' sections and four corner posts that are 12"high.  Well the posts are really 11" since 2x6 lumber is really 1.5"x5.5".  

I Cheated
After you cut all of your pieces lay them out on a flat surface and begin to assemble.  In the past I used clamps to hold the wood together then pre-drilled and screwed them together... or you can have a helper hold the wood together, but it always slips or moves.  I cheated this time and used a nail gun!  It was soooo much faster!  I still pre-drilled and used screws, I just don't trust brad nails to withstand years of abuse.  I tend to overdo it.  This was the original tutorial I used from Popular Mechanics.


3 Down
My husband helped me with these and we managed to put all 3 together in about 2 hours.  I also added some braces in the middle of the 8' sections, my old beds were a bit wobbly in the middle. Tomorrow we'll deal with the soil and "install" our beds.

Wednesday, April 13, 2011

Three-Dimensional Line & My First Skype!

978950598_df090e2849_b
In Between, an installation of red strings and nails.
I have a group show that opens this Friday in Kirkland, WA.  I'll be there, so if you're in town please come by and say hi.

Three-Dimensional Line
Curated by Ellen Ziegler for In Lieu Exhibit Space
April 16 - May 28, 2011
Opening Reception: Friday, April 15, 2011, 6 - 8:30 PM 

The Three-Dimensional Line presents eleven artists who amalgamate volume, dimension, scale, emotion and illusion with line in a myriad of ways. This exhibition explores the creation of three-dimensional form in the space of a room or in the mind of a viewer.

In an effort to make sense of the world, the eye and the mind navigate between two and three dimensions, using what are sometimes the barest visual clues. The humor and mischievous play apparent in these works exemplify the power that artists can harness to compel and confound the viewer. A perceptual game ensues; we feel our neurons firing.

ARTISTS
Timothy Brown
Robert Campbell
Diem Chau
Sean Johnson I LOVE HIS WORK! Yo man get a website! :P
Margie Livingston
Jean Lullie
and work on loan by Vija Celmins

Skype Yo!
In other news I have an opening tonight at Northern State University in Aberdeen, South Dakota.  I couldn't be there physically but in the age of technology who needs a body?!  Greg Blair, the exhibition coordinator suggested we use Skype to get me to the opening.  This is my first time using Skype.  We did a test run yesterday and I'm SO HOOKED!  Yes yes... this old lady is behind on the times.
Thanks for introducing me to such fun new technology Greg!  See you tonight.

Friday, April 8, 2011

Spring Fever

We finally have some sun in Seattle.  Last year we had to wait until June for sunshine.  I swear I was a few weeks away from hanging myself.  This nice weather is giving me a serious case of Spring Fever!  Even with a pile of serious work to do I'm compelled to dig in the garden... that and buying a $4 head of lettuce.  Seriously should lettuce cost $4 per head?!  It was organic, but still, that's ridiculous.

Back yard
We just moved into a new house a few months ago.  At our old home I had a small, fairly well established garden that provided us with a decent amount of veggies during the summer.  This new place is a blank slate, but it's a good canvas... there's not a lot of stuff I have to remove and it's flat.  I just have to build the beds and till the soil.  I feel like I'm racing against time to build my beds, everyday I wait to plant is a good growing day wasted.

Laying it out
This is the sunniest part of the yard by our boxwood hedge.  It's close to house and the water supply.
I have no idea what I'm doing.  I found a bundle of 2x4's by the side of the house and decided to sketch out some bed designs.  I like sketching on paper, but this gives me a much better visual.  All in all I'm going to start with 4-5 beds.  I think this will grow WAY MORE than 2 people can ever eat.  I only had 1.5 beds in the old house.  This will give me room to do root veggies, onions, garlic, broccoli and cabbages.  I can also set aside some space for a winter garden.  When we had the smaller space I stuck to high output crops like spinach, lettuce, tomatoes and beans. 

Overhead
An overhead shot from the kitchen window.  You can see 3.5 beds laid out here.  I've made them 8'wide by 4'deep with a 20"-24' footpath in between.  I'm planning out what I need for materials today and hopefully I can get this built next week.

Friday, March 25, 2011

Money For Japan & Higo Benefit Sale

Bank Wire to Japan
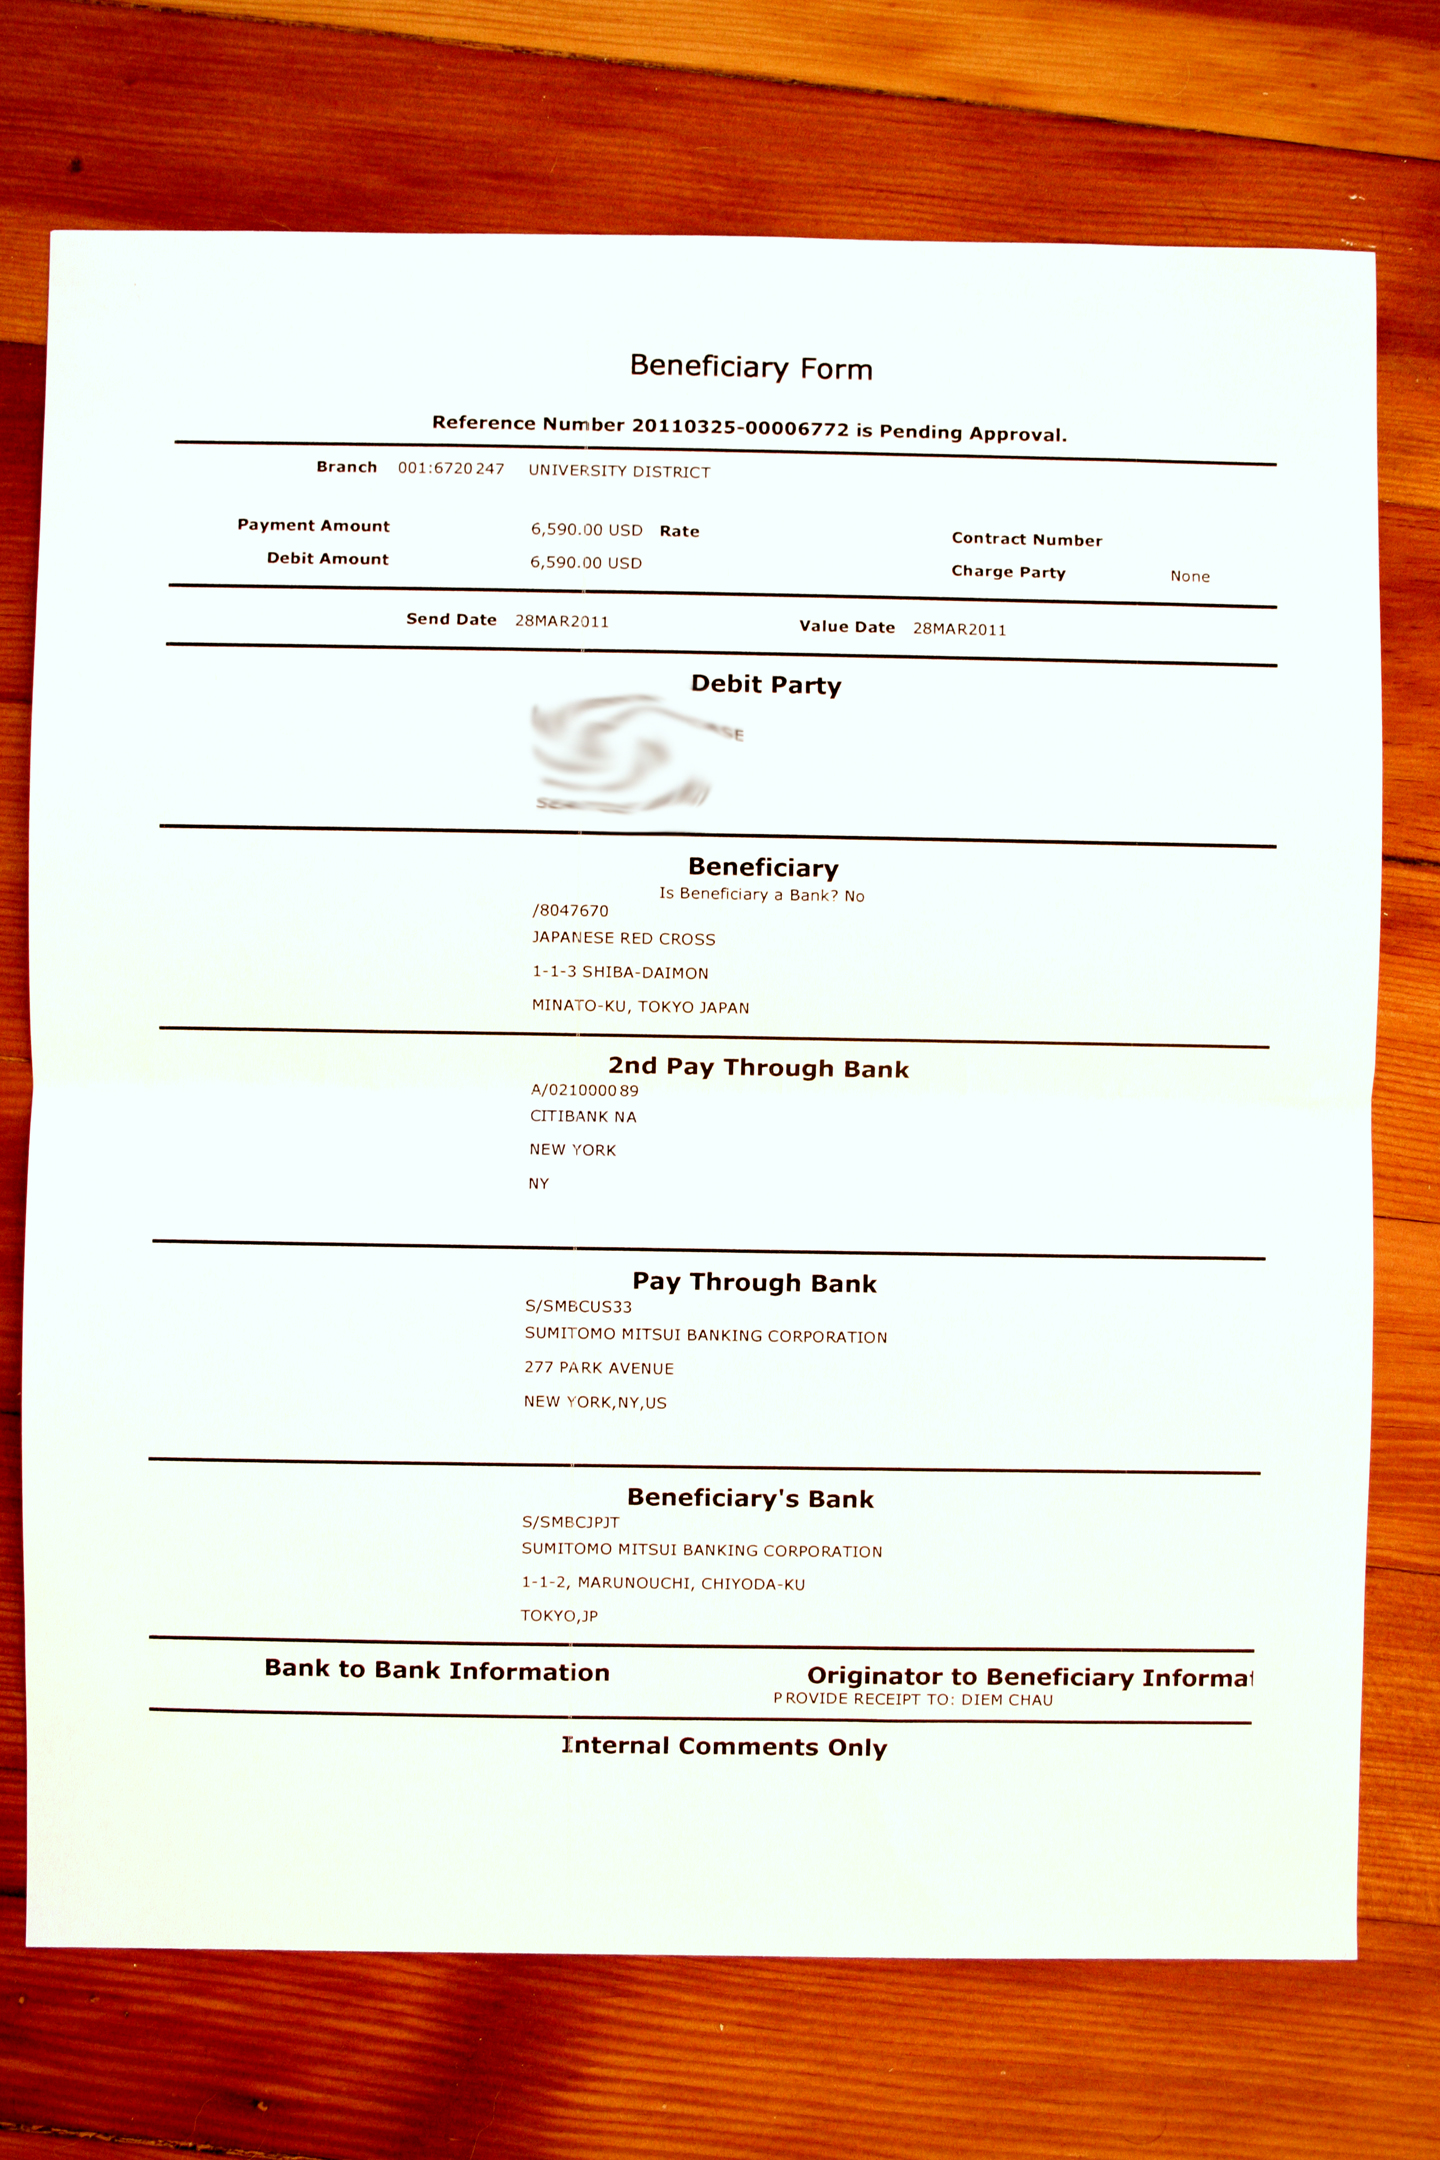
I wired $6590.00 to the Japanese Red Cross Society today!  This was done through Key Bank in the University District in Seattle.  The reference number is: 20110325-00006772, it was done this morning so the wire should be completed by now.  The money will be routed to the Sumimoto Mutsui Bank in NY then it goes to the Tokyo branch.  I've requested a receipt of the transfer after completion.  I think they'll email me a confirmation?  I've never done an international wire before.

I just wanted to say thank you again for everyone's contribution and the HUGE response to this raffle!   This means more than just money and provisions, we've sent them a great deal of good will and positivity too.  I really can't say enough thank you's.
Diem

In Seattle!
If you're in Seattle I highly recommend stopping by the Aritst For Japan benefit art sale at Higo.  I will be there on Sunday around 2-3pm.  I'll try to make it on Saturday too, but I'm not sure about the time. The Murakami Family (Higo Variety Store) will match up to $10,000 of the money raised by this event.
Kobo at Higo
604 S Jackson St
Seattle WA 98104
206.381.3000

Thursday, March 24, 2011

Thumbs Up To YOU!

Thumbs Up To You!
Thank you EVERYONE who contributed to this, you guys are amazing!  Also a big thanks to everyone who helped pass the word, I can't believe how many people knew about this raffle.  I was eating Pho with my husband last night and overheard a couple talk about it in the next booth.  LOVE IT!  The raffle ended at midnight PST (about 30 minutes ago) and we have raised a total of $6590.00 for the Japan Red Cross Society!  I will go make the bank wire in the morning and I'll post a receipt for the transfer after it's done.
THANK YOU THANK YOU THANK YOU

And The Winners Are!
And the winners are:
#153 Sean & Candace
#88 Eben
CONGRATS guys! I wish I can do something for everyone who entered ^_^

There's always a need for crisis relief.  If you're interested in helping I highly suggest donating to the Red Cross.

Wednesday, March 23, 2011

For Japan: Last Call!

For Japan: Last Call!
This is it folks, the last day of our raffle!  Ticket sales will stop tonight at midnight PST.  So far 275 people have raised $5820.00 for Japan.  Good job everyone, let's break the $6000 mark tomorrow!  I'll announce the total raised and the winners on Wednesday, March 24th.
Good luck all and good night.
Info on how to participate here: http://tinyhaus.blogspot.com/2011/03/for-japan.html